Showing posts with label Work In Progress. Show all posts

Wednesday, May 9, 2012

Beach Scene -WIP - Day 11

Today we needed to drop off Danny Boy at the vets for his semi-annual wellness checkup and needed vaccines ... plus major nail clipping.  So we took advantage and did a bit of shopping ... couple thrift stores, topped off with a visit to the grocery store. 

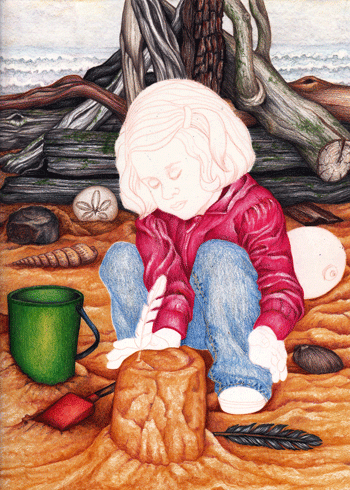
By the time we got back to the house I had about an hour before we needed to pickup up DB so I did a bit more work on the little girl's face and began working on her hair.  With her hair I put in the shadows and highlights using various browns for the shadows and beige and goldenrod for the highlights.  After that was complete I used dark brown and a light brown ink fine tip illustrations pens to detail the strands of hair. 

Tomorrow I will touch up different parts of the illustration and, hopefully, this colored pencil painting will be completed!

Happy day everyone!
Karen Anne

Tuesday, May 8, 2012

Beach Scene WIP - Day 10

I began today by finishing the hands, complete with sand!  The shoe was next followed by the feather in the sand castle.  Moving along nicely today! 

After studying the illustration awhile, I decided to darken the sand and make it a bit more grainy ... more like real sand.  I accomplished this by lightly rubbing the side of the lead (used several different colors of brown) over the sandy area and the little "hills" still remaining in the paper picked up just a tiny bit of added color and provided more of a sand look. 

Next I got one of Jim's old glass ball floats to use as a reference and noticed it has all kinds of little bubbles in the glass; so I took a piece of tracing paper and laid it over the, yet uncolored, glass float and with an ink pen I drew little circles and dots on the tracing paper which left indentations on the art paper.  I then began coloring in the float with varying colors of bluish green to deep greens, after which I used a very pale green pencil to blend all the layers together and achieve a glassy effect.    I think it looks OK, what do you think?

When I began coloring in her face I started off with my Prismacolor soft core pencils and quickly noticed the lead was a bit too soft to get the detail I was seeking.  So....out comes the museum putty and I removed the first four layers I had applied.  Put those pencils back and pulled out my Prismacolor Verithin pencils and began again.  I have about four layers on her face at this point and find these pencils are providing the softness and delicacy I am looking for.


I am finished for today and am going to kick back, relax and will be studying the drawing and plan how I want to proceed tomorrow.    Then I'll have to figure out "What's for dinner?"!

Happy Day!
Karen Anne

Monday, May 7, 2012

Beach Scene WIP - Day 10

Today was glorious outside!  In the low 80's .... I was so distracted I put very little time into the illustration ... I did mange to finish the jeans and begin working on the hands.

Tomorrow is back down to the low 60's so I'll most likely get a lot more accomplished....


Happy Day!
Karen Anne

Sunday, May 6, 2012

Beach Scene WIP - Day 9

I spent today working mostly on the little girl's pink sweat shirt, not sure but I may have put in too many folds.  I changed her slacks from red to jean blue, there is a section in the book "Colored Picture Portraits - Step by Step" by Ann Kullberg that provides steps to coloring jeans and I want to try it out.  I have just begun working on the jeans, will probably get them finished tomorrow and maybe have time for the hands, the feather and the shoe ... we'll see!


Her face and hair are still covered with the clear plastic masking paper (fisker).

Happy Day!
Karen Anne

Saturday, May 5, 2012

Beach Scene WIP - Day 8

I'm finished with the sand area of the scene for now, will probably add more shading once the little girl is finished.  Tomorrow I hope to begin work on her clothing and hands, I am planning to save the face and hair for the last segments of this WIP.

Company for dinner tonight so this will have to be as far as I go today!

Happy Day!
Karen Anne

Friday, May 4, 2012

Beach Scene WIP - Day 7

I don't know about you, but when I am working on a project my "art" area tends to turn from organized at the onset to utter chaos after several days.  Today I sat down to work on the scene and realized I had over 50 percent of my pencils spread all over the table leaving very little room for me and the drawing.  As you may have surmised by now, I spent nearly two hours cleaning and organizing ... ahhhhhhh ... I now have a fresh start midway through my project. 

Because of this little foray into organization I ended up with less time to devote to the scene than I had originally anticipated.  I did manage to color in the pail, the shovel, the cockle shell and the feather that is lying on the sand, PLUS a bit of sand shading!  We are slowly but surely working our way the to true subject of this little project.....

Here we go for this day's progress ...


This bit of mid-way cleaning has refreshed my spirit as well ... that is a good thing!

I don't know about your area of the country, but here in Portland it is raining buckets!  We've also been receiving more than our fair share of high winds ... here's hoping the ground doesn't get so water saturated that one of the large trees comes tumbling down ... especially not on the house!

Happy Day!
Karen Anne

Thursday, May 3, 2012

Beach Scene WIP - Day 6

I was off to a slow start today ... primarily because I was afraid of the sand and how to do it.  So while I was thinking about how to attack the sand I completed the sand dollar leaning against the log.  One of the extra shells I wanted to eliminate kept showing up as a ghost in the sand and I couldn't seem to find a way to color over it without the initial pencil indentations showing through ... so I gave into the shell and put him back into the illustration.  Shell won that round!

I finally decided, Oh Heck!  blending and stippling for the sand just isn't working so I took my goldenrod Prismacolor Verithin pencil and using the side of the lead began making squiggly marks in varying depth of color ... it seems to be giving me the effect I was seeking!  Yes!  I have now laid a base of squiggly golden rod over the entire sand area, I think I am off to a good start there.  I needed to begin the coloring of the sand pail because I kept getting the sand color into the bucket's "space" .... he felt he was loosing ground to the sand and asked that I at least give him a color primer.  He is much happier now ....

You know when you are getting too involved in a drawing when you began to feel empathy for the objects and they begin telling you what they want done!

Til tomorrow - Happy Day!
Karen Anne

Wednesday, May 2, 2012

Beach Scene WIP - Day 5

Well now, I learned a really important lesson today ... NOT a good idea to do art work with dilated eyes!  I thought a layer of Jasmine would look nice over the beige color - wrong!  Made the sand too yellowish ... I should have pre-tested it on a separate sheet of paper first.  So I walked away from the piece for a couple of hours.

Once my vision started working again I went in and removed as much of the jasmine color as possible with the aid of "Miracle" tape.  Jim had suggested that I put some moss on the driftwood, so I added that to a few of the pieces.  He thought they were too pristine looking as they were and I think it was a good suggestion.

Then I noticed the dents in the paper from one of my earlier funky shells was coming through (a ghost shell) and thought I would disguise that area as a rock.  I may turn the sand dollar into a rock as well, and add a few more stones and small pieces of wood to the scene.
We'll see how I feel about that tomorrow....

Not much to show today ..... I look forward to getting an early start tomorrow!

Happy Day!
Karen Anne

Tuesday, May 1, 2012

Beach Scene WIP - Day 4

Well today began with a visit to the dentist, followed by "Bills" (ever notice how "rich" you feel before you begin paying your bills, then you slide down into "poor" as the balance slowly decreases...), take Danny Boy for a short walk ... and finally back to my drawing!  Yes!

All of the original driftwood pieces are now complete (I may add more random pieces in the picture and for now I removed the two odd shells on the left side - Jim pointed out they were distracting from the subject and I agreed).  After this I sprayed a light layer of workable fixative over the finished area to protect it from smudging as I begin working on other areas.

Next I used an X-acto knife blade and gently traced around the little girl and her sand castle, removed the excess fisker masking plastic and exposed the beach area; leaving the little girl still protected with the remaining fisker. 

In this newly exposed area I began by laying down a light layer of beige over all the areas that are sand.  I am keeping a list of the colors I use for the sand so that when I work on the sand castle I'll remember the colors used in the sand, otherwise the little castle might turn out a completely different color.  I plan to use quite a bit of stippling in the sandy area to give the impression of sand.

So, for today we now have .....

 Happy Day!
Karen Anne Brady


Monday, April 30, 2012

Beach Scene WIP - Day 3

Most of the driftwood has now been completed, just the large piece behind the little girl and a small piece sticking out from under remain unfinished and they should be completed tomorrow.  I did manage to work in the ocean and blend it into the sky, and I think I'll keep it!  I have never before attempted ocean waves but these look pretty good to me, glad they were distant waves!


Guess you can now see that I am pretty much committed to sharing this work in progress with all of you.  I want to thank all you for your input and encouraging me to do so.  Gosh, I certainly have some really nice friends!

Happy Day!
Karen Anne Brady 

PS  Did you notice the extra piece of driftwood that I added to the pile??? 8~D

Sunday, April 29, 2012

Beach Scene - WIP - Day 2

On this day I took the tracing paper drawing and transferred it to Stonehenge paper (size 9" x 12") with the aid of my trusting, old, dependable light table.  This time I used a terra cotta color pencil to transfer the drawing, it's a bit on the pale side but at least this color will not interfere with the colors I add.

Over the area with the little girl and the sand I placed a sheet of clear fisker plastic, so that I won't be rubbing off skin oils or smudge that part while I am working on the driftwood pieces portion.  I am deviating from the colors in the photo because I like all the different hues and tones of driftwood (I love to collect odd twisted pieces of driftwood when I'm at the coast ... they remind me of beautiful works of art created by Mother Nature).  Some pieces are relatively new and hold some of their original color, whilst other pieces have turned wonderful shades of grey and whitened in light of the sun.   Others have been used in relation to a cozy beach fire and display charred pieces of varying degrees of charcoal and deepest black.  They are each, like us, unique in their shapes, forms and degrees of character.

I began with the first piece of wood and traversed across the page until six pieces have been completed.  Tomorrow is sure to see the addition of more pieces and perhaps the first indications of the ocean in the background.  I figure if I don't do well on the ocean, I can always turn it into a pile of sand!

Happy day!
Karen Anne Brady


Saturday, April 28, 2012

Question ....

I am beginning work on a new illustration and I was wondering if I have done too many works in progress (WIP) on my blog?  Would you like me to post daily pictures of this piece, or wait until I have finished it, made it into a slideshow video and then post that?

Your comments will help me determine which way to go ....

In the meantime, here is the sketch I worked up on tracing paper ... this is a beach scene.  I want to work mostly on back ground in this illustration and this sketch is loaded with beach treasures and driftwood and lots of sand!

These are the two photos I am working from,  I like the way the little girl is positioned in the first one and the driftwood in the second photo has a lot of character.....

t


Here is the sketch I created using these two photos and then adding more "stuff" to the overall drawing ...
Thanks for your input on whether you prefer daily postings or a slide show video when this project is completed!

Happy Day!
Karen Anne Brady

Friday, April 27, 2012

The little girl is completed and I have decided an apt title for this piece is "Little Daydream Believer".    The shirt and hands were finished today as well as another technique I decided to try out for a deep black background. 

I applied a layer of intense black marker pen to the background, but found that it was a bit uneven ... so I grabbed my trusty old bottle of India Ink and a flat broad water color brush and applied two layers of ink over the marker pen.  That did the trick and achieved the deep black background I was hoping for.


Since I finished a bit early I also added the photos of the progress on this illustration to a slideshow I am working on that features my past few works in progress.  If you'd like to see the slideshow video it is now available on YouTube at this link http://www.youtube.com/watch?v=7b2dQPrU3_M

Happy day!
Karen Anne Brady

PS  I am using techniques I have learned and am learning from the book "Colored Pencil Portraits - Step by Step" by Ann Kullberg and my other favorite book, by Alyona Nickelsen in her book "The Colored Pencil Painting Bible".

Wednesday, April 25, 2012

Little Girl WIP - Day Six

This day found me working on my little girl's hands and shirt, yep - I decided I like lavender!   Right now I have about 5 or 6 layers on the shirt of different shades of lavender and purple, I finished off today by using a paper stump to softly blend these colors together.

I am sure to be doing quite a bit more work on the shirt tomorrow and probably the hands as well.  For now, I am pleased with the way the progress is going.  Maybe tomorrow I will have a completed illustration for you?  We'll see ....


 I cleaned out my freezer earlier today (tomorrow is recycle/trash day) and found two nice New York steaks buried in there, so guess what I'll be popping onto the old BBQ tonight!  Right now they are nicely marinating away in some Kalbi (Korean) Marinade - Yum!   That, along with some Rice-A-Roni Fried Rice on the side plus a loaf of crusty french bread should prove to be a tasty dinner!

Happy Day!
Karen Anne Brady


PS  I am using techniques I have learned and am learning from the book "Colored Pencil Portraits - Step by Step" by Ann Kullberg and my other favorite book, by Alyona Nickelsen in her book "The Colored Pencil Painting Bible".

Tuesday, April 24, 2012

Little Girl WIP - Day Five

 Today I worked on the hair, adding more colors and detailing it with illustration pens in sepia and brown.  To place a bit more emphasis on the hair highlights, I used an X-acto knife point tip to lightly scratch away color in a few areas.

I then applied a wash of Prismacolor soft core salmon pink to the entire face area to deepen the facial tones and add some much needed pink to the flesh.  After that I proceeded to add the delicate eyebrows and eyelashes using extra fine tipped illustration pens.

Tomorrow I think I'll begin work on the hands and quite possibly her shirt, in the photo her shirt is pink but I'm kinda leaning towards changing that color to lavender.  Anyway, here are the results of today's efforts.


Happy Day!
Karen Anne Brady


PS  I am using techniques I have learned and am learning from the book "Colored Pencil Portraits - Step by Step" by Ann Kullberg and my other favorite book, by Alyona Nickelsen in her book "The Colored Pencil Painting Bible".

Monday, April 23, 2012

Little Girl WIP - Day Four

Early this AM I was out and finished weeding my two garden beds, turned the dirt in both and actually planted Rainbow Swiss Chard in one area.  I will begin planting seeds for the other herbs and plants in mid to late May according to the seed packet instructions.  Last year I had a curly leaf parsley plant and I let it flower and go to seed, but I forgot to harvest the seeds ... much to my delight I see that it seeded itself in a nice little 2' x 2' square and the new baby starts are doing quite well!  I guess Mother Nature planted that little patch for me ... Thank You Mother Nature!

Now to the little girl drawing ... I am really tired today so I didn't get as much done on the picture as I wanted, that's OK, I got a good start on the hair on the right side of the paper.
First I laid down a nice even wash of the color beige, I then used a sharpened mahogany Prismacolor soft core pencil to define the the curls and indicate where I want the shadows.   Once I have completed the hair, I will go back to the shadowing of the face and add more color so it doesn't look quite so pale. 


Happy drawing, coloring and gardening!
It is supposed to rain for the next 6 to 7 days, so I'm sure to have plenty of time to devote to my little girl in the next few days or so.

Happy day!
Karen Anne Brady

PS  I am using techniques I have learned and am learning from the book "Colored Pencil Portraits - Step by Step" by Ann Kullberg and my other favorite book, by Alyona Nickelsen in her book "The Colored Pencil Painting Bible".


Little Girl WIP - Day 3

After working on exorcising the weeds from my raised garden bed yesterday I still had some time on my hands so I sat down and did a bit of work on the little girl's hair.  Like my gardening efforts, she is coming along slowly but surely.

It seems that most of my children illustrations seem to end up with red hair, I must have an unconscious liking for red hair?  I think I am going to have to study that chapter in Ann's book on how to color hair for brunette's; would have been smarter to do that "before" I started on the hair in this illustration.  Oh well, at least it is beginning to look like hair!

Happy Day!
Karen Anne Brady


PS  I am using techniques I have learned and am learning from the book "Colored Pencil Portraits - Step by Step" by Ann Kullberg and my other favorite book, by Alyona Nickelsen in her book "The Colored Pencil Painting Bible".

Friday, April 20, 2012

Little Girl WIP - Day 2

Today began with my adding several more layers of skin tone colors to the little girl's face.  I find it a bit difficult to determine the shading when just working on the skin so I moved on and began working on her eyes, her lips and a bit of the hair, especially the hair around the face.  By adding these features I will be able complete the shadowing on the face.

At one point I had applied so many layers that I was finding it difficult to add more color because the "tooth" of the paper had been flattened by all the additions.  I took one of my blending stubs and gently smoothed the layers together after which I applied a coat of workable fixative.  When you begin to lose the "tooth" on the paper, a light coat of workable fixative allows you to add more shades with relative ease.  Another tip to remember, when you have applied too much color it can be lifted off the paper with a kneadable eraser or by lighly placing a small piece of magic tape on the offending area and using a ball point pen to trace over the area you want lightened, then gently lift the tape up and it removes the unwanted marks.

Her face is beginning to come together and is now taking on a realistic appearance.  There is still quite a bit more work to be done, but at this point I am beginning to feel a sense of accomplishment.  Here is where we are at today's end .....


The weather here in Portland is supposed to be in the 70's for the next few days and I will be taking advantage of this good fortune to weed out some flower beds and put in some seeds for a nice herb garden.  Ergo, I may not get any work done on our little girl until I get a good handle on my gardening endeavors.

Til I post again ... Happy Day!

Karen Anne Brady

PS  I have been studying this drawing since 5PM (its now 8:24PM),  have noticed  three glaring mistakes I am going to need to correct at the first possible chance.  Primary rule in art ... if it doesn't look right ... it is wrong ... I found 3 wrongs.   I'm working off a photo, what works in a photo and I was trying to hard to faithfully follow from the photo ... doesn't always work in an illustration, now I am going back to "Karen Basics" ... do what feels right, not what you think you see.

PPS  I am using techniques I have learned and am learning from the book "Colored Pencil Portraits - Step by Step" by Ann Kullberg and my other favorite book, by Alyona Nickelsen in her book "The Colored Pencil Painting Bible".

Thursday, April 19, 2012

Little Girl WIP - Day 1

I'm beginning work on a new drawing, as yet untitled.  Thought I'd share this work in progress with you since I am again trying new things.  This time I wanted a subject where I could learn to do more with the eyes, work on hands and try out curly hair.  I just happen chanced upon a delightful photo and was given permission to use it for my next illustration.

So here is the photo and the tracing I made of the original sketch (original sketch being way too messy with erasures and smudges to get a good scan of) ....

I then took the tracing and retraced it onto a nice piece of Stonehenge paper (this paper is totally awesome and extremely forgiving) using a Prismacolor Verithin pencil in the color of Terra Cotta.  On my last picture, I had traced the drawing onto my art paper using a graphite pencil and had troubles with the graphite lead when I was applying my colored pencils.  Figured this should eliminate that problem!

I commenced to lightly draw in the wavy curls onto the piece of Stonehenge paper and began the slow process of applying my skin tones.  First I layered all the skin areas with a very light even layer of "Cream" which I then followed with another light even layer of "Light Peach".  I then used the "Light Peach" to begin setting in the areas of shadowing; this was followed with very light layers of "Deco Pink", "Jasmine", "Pink Rose", and "Beige".  Each being applied to enforce the shadowing and lightly blending into the original foundation colors of Cream and Light Peach.  

There are over 21+ hues within  6 color value groups that can be applied to the skin to create a realistic looking image, so you can see I am not even half way through the Six Value Groups that contain 21+ hues.  But, I am establishing a very good base.

Now, as I have said before, I am NOT a portrait artist but rather an artist who prefers to draw people ... ergo, this illustration may or may not end up looking like the original subject.  But I certainly hope it will end up nice!


Right now it looks a bit spooky, as you follow along on this "Work In Progress" (WIP) you will see the image grow and come together in this artistic process of creating a colored pencil painting.  Wish me luck!

Happy Day!
Karen Anne Brady

PS  I am using techniques I have learned and am learning from the book "Colored Pencil Portraits - Step by Step" by Ann Kullberg and my other favorite book, by Alyona Nickelsen in her book "The Colored Pencil Painting Bible".

.

Saturday, April 7, 2012

WIP - Day Eight

Yesterday I thought I had finished and, as usual, I placed the piece on a small easel on our coffee table.  Every so often I look at it and think, OK its fine.  Later in the evening my husband remarked that the line on the jaw made it look like the boy was holding up a mask to his face.  I looked at it again and could clearly see what he meant, it did look more like a mask than a face! 

Taking his critique, today I worked on the jaw line and neck areas ... adding more shadowing and softening the sharp line.  Believe me, I was really concerned about overworking it and had to get up and walk away several times.  My husband and I finally agreed that this is a good as it is going to get ... so, I hope you like the subtle changes ....


I think I have decided to title this piece "Tender Young Thoughts",  what do you think?

Happy Day!

Karen Anne