Tuesday, June 22, 2010

Sunday, June 20, 2010

NW COAST STYLE CLAM DESIGN

This is a drawing I attempted in NW Coast Style and decided to finally share in ACEO Open Edition Format.


CLAM - NW Coast Style Design (Meaning)

The shell, as a whole, symbolizes the body of the entire family and a celebration of life.  The white panels express the different branchs of the family - each separate but each a part of the whole.

The black border flowing around the shell and each panel implies the never ending cycle of life that binds the family as one.  It further denotes the different paths each takes, whether as an individual or as a group, in life’s journey.  The paths fork but eventually come together as one.

The eyes are indicative of all family members watching over each other.  Helping hands are all around to lend support and love.  Oars (paddles) represent guidance from elders to young in hopes the youth will steer toward successful and happy life paths.

The Clam designs on either side of the shell represent elders in the family who share their knowledge and skills with gentle words and caring love.  The solid circles are symbolic of the “pearls” of wisdom passed down to each new generation.

If you are interested, you can find it for sale in My Etsy Shop.

Friday, June 11, 2010

New ACEO Original Series of Buffalo Skull illustrations

Hi!  I'm pleased to share with you my recent set of a series of Buffalo Skull ACEO Originals.  I am slowly listing them in my Etsy Shop http://www.etsy.com/shop/irelandbrady starting today (6/11/2010).  I am selling the originals and a limited edition of 11 of each illustration.


The  above ACEO is available as an original ACEO ORIGINAL Buffalo Skull with Blue and Black Design by Karen Anne Brady


I hope that you enjoy my latest endeavors!  Thanks for looking!

Tuesday, May 4, 2010

ACEO - Open Editions Prints Just Listed On Etsy

"I'm Just Ducky!"

"Irish Laddies Playing On St. Paddy's"

"Young Highland Dancers"

Sunday, April 18, 2010

ACEO - How to make a simple ACEO Original

"Tutorial Post"
I recently became interested in how to make an ACEO while reading posts at NotebookInHand (a really great site you should check out if you're a creative person wanting to be in the company of other creative people)..... http://www.notebookinhand.com   


I wanted to learn how to make one so I started looking around, found out that ACEO is an acronym for Art Cards, Editions and Originals.  Basically there is only one rule involved in creating an ACEO and that is it has to measure 2-1/2" X 3-1/2".  I learned the history of ACEO and of ATC (Art Trading Cards), but not that much on how to make an original ACEO.  


While I was making one of my first ACEO cards, my husband suggested I photograph all the steps and post "How To Make An ACEO" on my blog.  Good suggestion!  So that is what this Post is about ... 


I first get inspiration from something ... in this case it was a plaster Hooded Monks' Heads Candle Holder that has been in my husband's family for ages ...
I then needed some type of paper that was fairly heavy to work with and remembered a bunch of matte board scraps we had salvaged earlier from a local picture frame company and thought "Aha! That would be perfect!"  ...  so I gathered up my scrap for recycling into an ACEO.  I then cut a pattern, 2-1/2" x 3-1/2" to draw onto the piece I would be using ...
Using the dark blue pattern, I traced it onto the white matte board...
I then drew on a rough draft in pencil...
Worked on the sketch some more...
Took a .005mm ink pen and inked over the pencil sketching...


Erased all the pencil lines...
Found a box of Water Color Colored Pencils ... I had never used these type of pencils before, so now was a good time to experiment!

I colored in the areas I wanted done in watercolor effect, layering the colors to get the colors I was seeking.  I only had 8 pencils so  I figured by layering I could get close to the color I was seeking ... 

Found a paint brush and water, brushed on the water and achieved the following results:


After this I went back to my regular colored pencils and began applying a base color for the flesh... 


Now began shading the face and other areas of the picture that I wanted enhanced...
Once the picture was shadowed and enhanced I began the inking process...

For finer lines, as around the eyes and face I used a .005mm pen, for outline strokes I used a heavier stroke with a .3mm pen...


I then went on to add details to the picture using .1mm, .2mm, and .005mm pens
with the finished results shown below ...

Now its off to the cutting board to trim it down to regulation ACEO standard measurements...


With this completed I have my regulation size ACEO!


But, I want it to look a bit more finished so I grab a marker pen and darken the edges as show in this next example ....


To finish off the piece, I turn it over and title, date and sign the piece, completing the ACEO!  I did it!


I had previously done Hooded Monk #1 and Hooded Monk #3, so with the completion of Hooded Monk #2 I have a completed set.  What do you think?


I hope you have enjoyed and perhaps learned a bit through my little guided journey into the making of an Original ACEO!  

Wednesday, April 7, 2010

New Illustration!

Hi Friends!  Just finished a new illustration that I had a lot of fun with ... presenting:
TOADS AND SNAILS AND SNAPPY CATTAILS!

Saturday, April 3, 2010

LOOK! BUTTERFLIES!

I just finished my latest drawing & thought I'd share it with you!  A young girl with butterflies that I have titled "Look!  Butterflies!".


http://www.etsy.com/view_listing.php?listing_id=44083497

Sunday, March 28, 2010

ANATOMY OF A DRAWING TUTORIAL (Or at least the way I do it....)

"Tutorial Post"
My dear friend and I were talking recently and she asked how I went about creating a drawing.  I kinda explained it to her and she asked if I could write it out so she could more clearly understand my creative process ... thus became the topic for this Post!


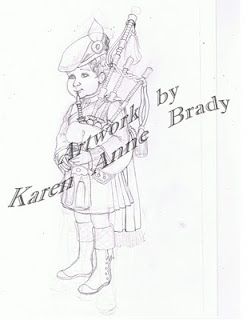
I begin first with an idea or inspiration.  In this case I was looking through some of my old sketches and found two that I had done back in the 1970's or 19780's.  I thought it would be fun to update the drawings and combine them in one picture.
I now proceed to redrawing each for use in my updated version.


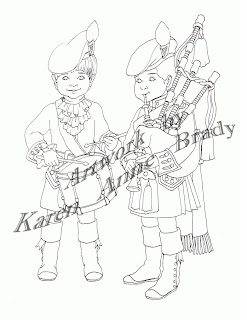
As you can see, I have changed the position of the Piper and began plotting out my color scheme in the Drummer.


Now I make a photo copy of both pictures.  Cut them out and position them on another piece of paper and photo copy that.  I now have the layout of my illustration.
I then take this drawing over to my light table and lightly trace it onto a clean piece of Bristol art paper.  Once this is done, I begin inking in the lines with a permanent black ink pen until I have a completed drawing.


Here I end up with a drawing that is great for a color book illustration or having made into a rubber stamp.  I make a copy of this inked drawing in case I want to use it in the future, for whatever reason.  I then take the original and begin to color  in the characters with colored pencils.


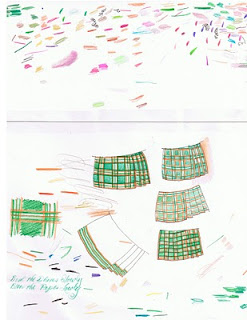
While I am coloring, I keep a sheet of paper besides me for testing color schemes, color combinations, etc.


I complete coloring the lads and adding details with my ink pen and end up with the following:


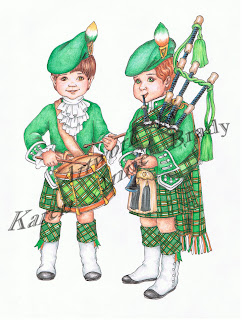
At this point I could quit, but decide some background would probably be nice ... so I add background!


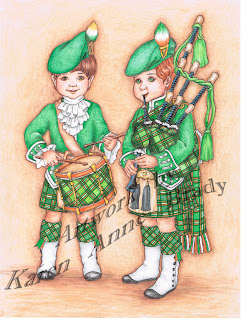
Now I study the drawing and determine that I want to add a bit more detailing with the pen and adjust the density of the colors by layering on more colored pencil.  Once this is completed and I am happy with the results, I have my completed illustration!


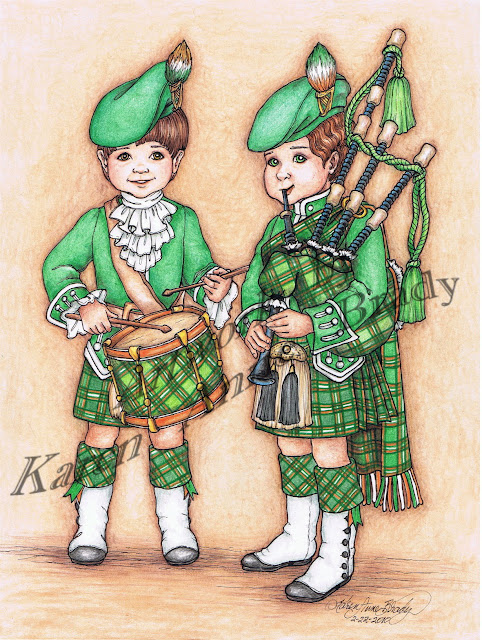
Once I am happy with the results, I scan it into my computer and add my watermark!  
Sometimes I'll even have a little fun with the photo shop I am using and "tweek" the drawing a bit to give it a different look.


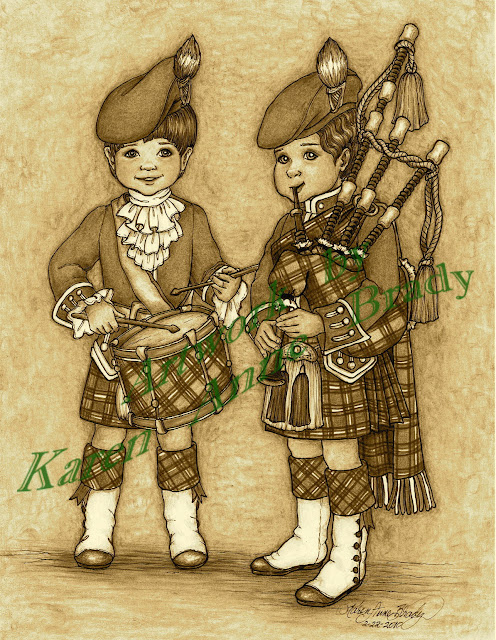
Here I changed it from full color to Sepia Tones  ...  figured this would be good for people who didn't care for the color scheme I had chosen but still liked the drawing.

AND THAT IS HOW I CREATE A DRAWING!  


Sunday, March 21, 2010

ANNOUNCING THE WINNER OF THE "TITLE MY DRAWING & WIN" CONTEST

Hello!  Well, after reviewing all submissions, we are proud to announce that the winning entry "IRISH LADDIES PLAYING ON ST. PADDY'S" is the winning entry that we received from Jan Schultz of California!  Jan's choice of prints as her prize was, naturally, "Irish Laddies Playing On St. Paddy's"!


We want to thank all of those who participated with so many delightful ideas!  This was  fun!